June 23, 2008
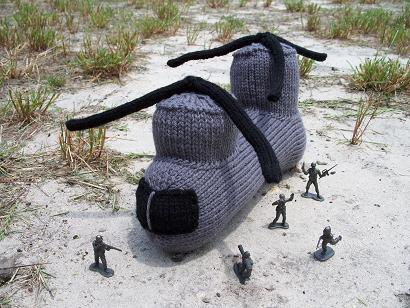
CHINOOK KNITTING PATTERN
Luckily for me, CaliValleyGirl's husband pilots the most stuffed-animalizable military vehicle that exists.

So it was a no-brainer to try to make one for their new baby.
I wing it all the time in knitting with simple things like bags and scarves and hats, but this is my first knitting invention, so I took notes along the way to write my first pattern. I am sure there will be some sort of mistake in it, but if you're at the point in your knitting where you're trying to make a helicopter, I am sure you can figure it out. Or email me and I'll do my best to help.
KNITTING PATTERN FOR A STUFFED CHINOOK HELICOPTER TOY
Supplies:
grey and black craft yarn, the stiffer and cheaper the better, to hold its shape
size 6 straight and double-pointed knitting needles
blunt sewing needle
Knitting the Chinook consists of three main patterns: the fuselage, the rotors, and the fore and aft pylons, which CaliValleyDude assured me are not called "the sticky-up parts on top."
FUSELAGE:
Using size 6 needles and grey yarn, cast on 14 sts.
Working in stockinette stitch throughout, work two rows.
Row 3: Inc one st into first 2 sts, k (3), inc one st into next 4 sts, k (3) to last 2 sts, inc one st into last 2 sts.
Row 4: purl
Repeat last two rows, with number of sts in brackets 4 more each time, until you have 46 sts total.
Work 66 rows in stockinette stitch.
Next row: ssk, ssk, k (15), k2tog, k2tog, ssk, ssk, k (15), k2tog, k2tog
Next row: purl
Repeat last two rows, with number of sts in brackets 4 less each time, until 14 sts remain.
Work 2 rows. Bind off. Using tail, sew up underseam while filling with stuffing.
FORE PYLON:
With size 6 dpns, cast on 42 sts. Join to knit in the round, being careful not to twist the sts. Knit 12 rounds. Purl one turning row. [Thanks to Susan for providing me with more precise language here.]
Shape top:
Round 1: Knit
Round 2: Knit
Round 3: *Sl 1, k 1, psso, k 2, k2tog; rep from * to end of round – 28 sts remain
Round 4: Knit
Round 5: Knit
Round 6: *Sl 1, k1, psso, k2tog; rep from * to end of round – 14 sts remain
Round 7: Knit
Round 8: *k2tog; rep from * to end of round – 7 sts remain
Cut yarn, leaving a 6” tail. Thread tail on a tapestry needle, draw through rem sts, pull tight, and fasten off to wrong side.
AFT PYLON:
[Same as fore pylon, only a little taller.]
With size 6 dpns, cast on 42 sts. Join to knit in the round, being careful not to twist the sts. Knit 20 rounds. Purl one turning row.
Shape top:
Round 1: Knit
Round 2: Knit
Round 3: *Sl 1, k 1, psso, k 2, k2tog; rep from * to end of round – 28 sts remain
Round 4: Knit
Round 5: Knit
Round 6: *Sl 1, k1, psso, k2tog; rep from * to end of round – 14 sts remain
Round 7: Knit
Round 8: *k2tog; rep from * to end of round – 7 sts remain
Cut yarn, leaving a 6” tail. Thread tail on a tapestry needle, draw through rem sts, pull tight, and fasten off to wrong side.
Stuff pylons and sew to fuselage.
ROTORS:
[This section is a little confusing, but essentially you're making three i-cords and then decreasing them all together at the end to attach them to each other and make them radiate out from the center.]
With size 6 dpns and two strands of black held together, cast on 5 sts. Work i-cord for 33 rows. Leave stitches live on the dpn and use a new dpn for next rotor blade.
Make 3.
On the last row of the third rotor blade, knit to last stitch.
K2tog with first stitch of another rotor blade.
Slip next stitch, k2tog, psso.
Knit last stitch together with first stitch of remaining rotor blade.
Slip next stitch, k2tog, psso.
K2tog with last stitch of the first rotor blade, joining around.
Slip next stitch, k2tog, psso.
7 sts remain.
Cut yarn, leaving a 6” tail. Thread tail on a tapestry needle, draw through rem sts, pull tight, thread through the underside of the rotor and tighten on that side too. Use tail to fasten the rotor to the top of the rotor cap. Weave in ends of i-cords.
Repeat for second set of three blades.
WINDSHIELD:
With size 6 needles and black yarn, cast on 18 sts. Work 12 rows in stockinette stitch. Cast off.
With grey yarn, make a dividing line down the middle of the window. Sew to front of Chinook.

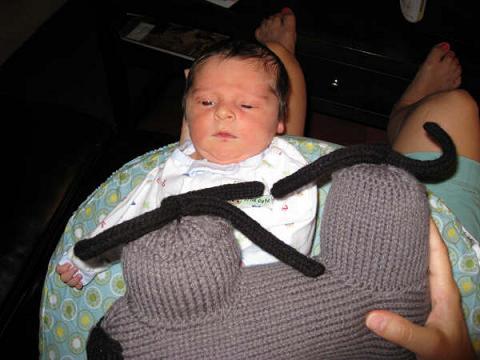
This picture cracks me up, because CaliValleyBaby is looking at the Chinook like, "Clearly this is not an age-appropriate toy." You'll grow into it, son.
Now watch, he'll want to be a tanker!
Posted by Sarah at June 23, 2008 12:45 AM | TrackBackDon't even JOKE about the ability to knit a tank or Hubs will start bugging you for one...for HIMSELF. :) Good work!
Posted by: Guard Wife at June 22, 2008 10:35 PMHoly COW, that's the cutest thing ever! Though the first time I saw the pic with the baby, it occurred to me that it looked like two boobs with pasties in his little face. Yeah, I am demented. But you're laughing, right? RIGHT?
Posted by: Allison at June 22, 2008 10:58 PMFrackin' awesome. :)
Posted by: Anwyn at June 22, 2008 11:09 PMOMFG - that is so cute! I have yet to attempt any stuffed animals/objects, but this is pretty inspiring!
Do you belong to Ravelry? I bet there would be people on there interested in trying out your pattern.
Love the caption for the picture of the baby. :)
Posted by: loquita at June 23, 2008 08:39 AMOMG that is one of the coolest things I have ever seen. You are really amazing Sarah.
Posted by: Mare at June 23, 2008 10:20 AMTHAT IS ADORABLE!!! Now I dare them to make a pattern for a c-130!
you do amazing work!
Posted by: lea at June 23, 2008 12:41 PMYeah, that's super cute. I love it!
Posted by: Nicole at June 23, 2008 01:39 PMomg this is hilarious, but in an awesome way! I love it! You should totally post this on ravelry! One of these days I'll gather up the courage to make something up like this!
Posted by: Tania at June 23, 2008 04:02 PMTHAT IS AWESOME.
(Yes,I said that out loud before I
read any of the comments.)
Hubby first asked what happened, and then upon closer inspection said "Wicked cool!" with a gleam in his eyes. :)
Posted by: Reasa at June 23, 2008 11:53 PMI'm quite the hooker and not the knitter, but that is a really cool little helocopter you got going on there!
Posted by: Darla at June 24, 2008 01:11 AMSo, do you need to do anything to stiffen the rotors? I made the mistake of showing this to my husband, and now he wants me to see if I can knit a C-130...
Posted by: audette at June 26, 2008 01:06 PMI am super-impressed. Not a knitter, just an admirer.
Posted by: Donna B. at June 27, 2008 10:27 PMI am passing on this post to my knitting group. It's a dishcloth group, but many of us have troop members over in Iraq and Afghanistan, so I know someone will attempt it. What a great job!
Posted by: Debra L Brown at July 2, 2008 01:34 AMOkay... am I the only one that thinks this would be absolutely fantastic for ADULTS TOO!? Man oh man, if my Dad were still alive, I would SO make one for him (he was a door gunner in VietNam)... So totally inspired! You could charge for this pattern and make a mint! :D Awesome work!
Posted by: Candace at July 2, 2008 04:59 PMThat is beyond cute. I have to make one for my dad, who flew in Vietnam. He appreciates things like this, a head-bopper (for bopping people what piss him off) and the infamous nose warmer. Thank you SOOOOOOOO much!!!
Posted by: MonkeyGurrl at July 2, 2008 06:23 PM